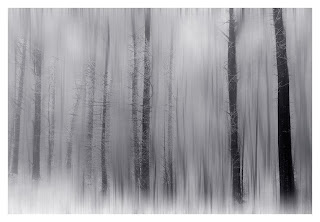
I wanted to share an image I made this past winter while leading a photo workshop in West Virginia. We found ourselves high in the mountains and it was very cold and foggy. The thick moisture from the fog and the extreme cold caused ice to form on everything. Our bodies, the trees and the road were all covered in the slick stuff. Dark Forest is an image that has been manipulated in post processing. I first started by loading the original file in Photoshop CS3.
Step 1: I created a duplicate layer and apply Motion Blur Filter ( 90degrees at 450 pixels). I then reduced the layer opacity to 90% and applied a mask at 60% over the tree trunks to allow some of the detail to shine trough.
Step 2: I created a second duplicate layer and applied a Gaussian blur at 25 pixels. The opacity of the layer was reduced to 25%. There was no masking done on this layer.
Step 3: I applied a Channels Mixer layers adjustment to the image. The settings were at Red(+80%) Green(-20%) and Blue(+40%)
Step 4: I made 2 more layers adjustments. First, a levels adjustment. I slid the sliders together to create more contrast and the 2 layers adjustment was color balance. I increased the blue channel at +9.
That's it. Here are the before and after photos.
Original Capture


1 comment:
You are killing me! I'm off to find an image to do this with right now! FANTASTIC Joe just simply fantastic. I really enjoy your creativity and willingness to play with technology. Very inspirational.
Post a Comment